
Make Dollar Tree basics look like rented wedding centerpieces with 10 easy hacks: stacked-glass hurricanes, faux stone compotes, floating candles, mercury gl...
Gathova
Faux Metal Finish for Plastic Platters

Joanna Mercer
Joanna Mercer is an enthusiastic DIY event decorator and the creative spirit behind Gathova's party guides. With years of hands-on experience designing stunning tablescapes, balloon garlands, and custom photo backdrops for friends and family, she specializes in accessible, budget-friendly celebrations. Joanna loves sharing her practical tips and crafting tutorials to help anyone turn an ordinary space into a memorable party venue.
Published · Last updated
The first time I tried to “upgrade” plastic catering platters, I got cocky. I grabbed a can of shiny gold spray paint, blasted a tray in my driveway, and proudly set it out for a birthday buffet. Under the party lights it looked less “antique brass” and more “toy robot.” Lesson learned: believable faux metal is all about layers, texture, and strategic wear, not one coat of metallic paint.
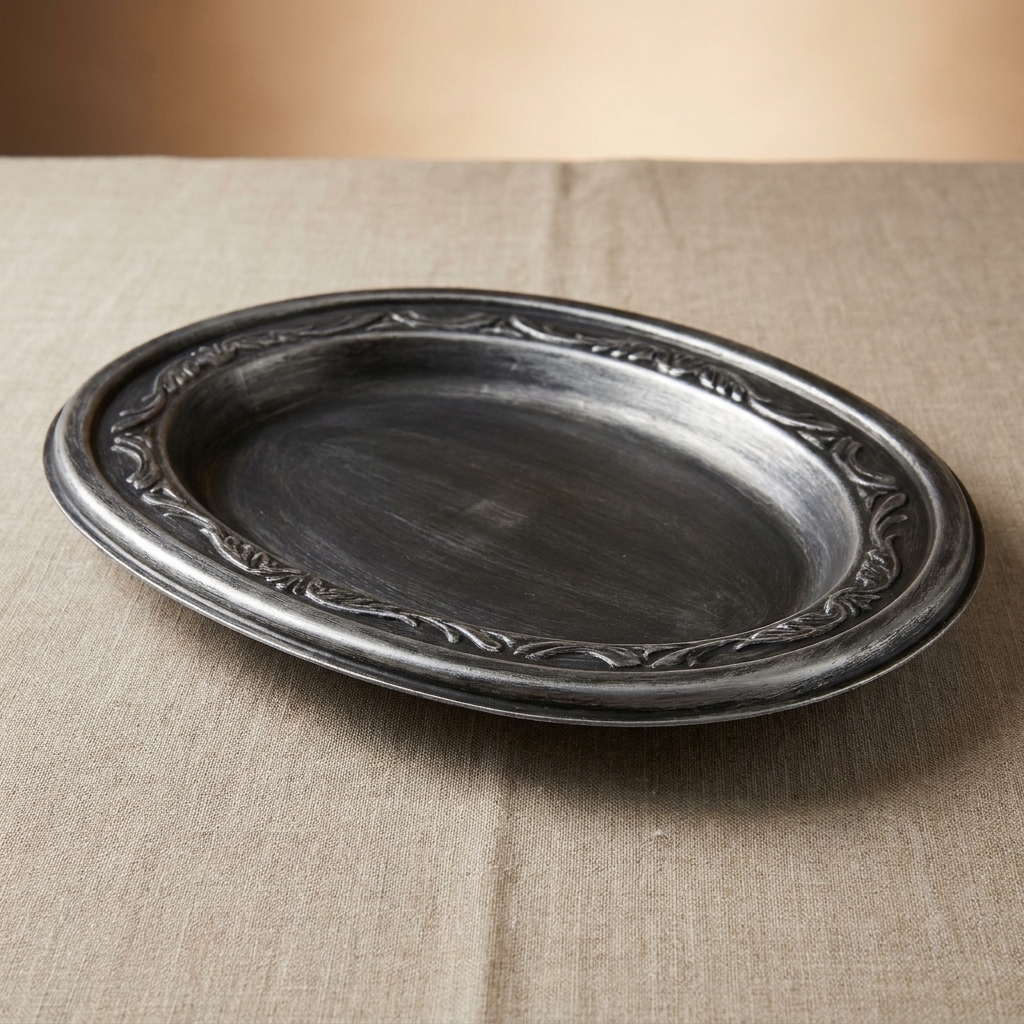
This is my go-to method for turning flimsy plastic trays into metallic-looking decorative serving pieces that read like thrifted vintage, especially from a few feet away on a styled buffet. I use them for wrapped items, napkins, utensils, or with a liner or separate food-safe dish on top.

What makes plastic look like real metal
Real metal has depth. It is not one flat color. When you fake it, you are recreating three things:
- A dark base that mimics shadow and age.
- A mid-tone metal layer that looks like the actual material.
- Highlights and wear on edges and raised details, where hands and polishing would naturally hit over time.
Once you start thinking in layers, even the cheapest platter can look surprisingly elevated.
Supplies (budget-friendly and easy to find)
- Plastic serving platters or trays (smooth or lightly textured both work)
- Dish soap and water, plus rubbing alcohol (this is your degrease step)
- Fine sandpaper (220 to 320 grit) or a sanding sponge
- Spray primer that bonds to plastic (often labeled “bonding” or “for plastic”)
- Spray paint in a dark matte or satin shade for the base (black, espresso, dark brown, or charcoal)
- Spray paint in your chosen metal tone (antique gold, brass, bronze, pewter, or aged silver)
- Acrylic craft paint in black and brown (for aging washes)
- Small chip brush or disposable bristle brush
- Soft rags or old T-shirts
- Optional but amazing: metallic wax (often sold as Rub ’n Buff style) for realistic highlights
- Optional: clear topcoat (choose based on how you will use the tray, details below)
Quick safety note: Spray outside or in a very well-ventilated area, and follow label directions.
Quick food note: These finishes are for decor and buffet styling. I do not treat painted plastic as food-safe. Use them for wrapped foods, napkins, utensils, or add a liner (parchment, doilies) or set a separate food-safe dish on top.
Step-by-step: Faux antique metal finish that actually looks real
1) Wash, degrease, and let it dry
Start with hot soapy water, rinse well, and dry completely. Then wipe the entire tray with rubbing alcohol to degrease and remove any leftover oils. Paint hates invisible residue.
2) Lightly scuff the surface
Use 220 to 320 grit sandpaper and lightly scuff the whole tray, especially glossy areas. You are not trying to gouge it. You are just giving primer something to grip.
3) Prime like you mean it
Apply a light coat of bonding primer, let it dry to the touch (or wait the time listed on the can, often 5 to 10 minutes), then apply a second light coat. Rotate the tray and spray from multiple angles to catch rims and beading.
Let primer cure per the can. If you rush this step, you will be able to scratch your finish with a fingernail later, and nobody wants that an hour before guests arrive.
4) Apply a dark base coat
This is the secret sauce. Spray a dark matte or satin base over the entire tray. Dark base reads like old metal and creates instant depth in corners and grooves.
Tip: A warm dark brown often looks more “antique” than pure black, especially under warm indoor lighting.
5) Mist on your metallic layer (do not fully cover)
Once the base is dry, spray your metallic color in thin, uneven passes. You want the dark base to peek through in recessed areas and around edges. Think “dusting,” not “repainting.”
Hold the can a little farther back than usual and keep your hand moving. Stop before it looks perfect. Perfect is what makes it look fake.
6) Add age with a quick wash (my favorite realistic step)
Mix a simple aging wash: a pea-size dab of black paint plus a pea-size dab of brown paint, thinned with 1 to 2 tablespoons of water until it is inky. Brush it into details, corners, and around the rim, then wipe back with a rag while it is still wet.
This settles into texture and instantly makes the platter look like it has history.
7) Dry-brush highlights on raised areas
Put a tiny amount of metallic acrylic paint on a dry brush, wipe most of it off on a paper towel, then lightly skim the brush across the raised rim, handles, and any decorative edges.
This is where the “metal” comes alive. Highlights should hit only the high points.
8) Optional but next-level: rub metallic wax for a real metal sheen
If you have metallic wax, use a soft rag or your finger to rub a whisper-thin amount onto the edges and raised details. Buff gently. It gives a more convincing luster than most spray metallics.
9) Seal (or do not) based on how the tray will be used
For display-only trays (risers, styling pieces): you can often skip sealer if the paint is fully cured and the tray will not be handled much.
For trays that will be moved around a lot: use a clear topcoat that works well over metallic finishes. I prefer a matte or satin clear to keep the antique look. High gloss can push it back into “spray painted.”
Practical tip: Test your clear coat on the underside first. Some clears can dull metallics or react and wrinkle if sprayed too heavy.
Dry time and durability
Painted plastic can look shockingly convincing, but it will never be as tough as real metal. Plan for a little kindness during transport.
- Dry to handle: often 1 to 2 hours (longer if cool or humid)
- Gentle use: after 24 hours
- Harder cure: 24 to 48 hours is better, especially before stacking or packing
If you are transporting a set, add paper towels or felt between trays so the rims do not rub and scratch each other.
Choose your “antique” look: four easy formulas
Pick one of these combos and you will get a believable finish fast.
Antique brass
- Base: dark brown or black
- Metal layer: antique gold or brass
- Aging wash: brown-heavy (less black)
- Highlights: brass wax or light gold dry-brush
Aged bronze
- Base: black
- Metal layer: bronze (mist it on)
- Aging wash: black-heavy
- Highlights: coppery bronze on edges only
Pewter
- Base: charcoal
- Metal layer: muted silver or “pewter” spray
- Aging wash: black with a tiny bit of brown
- Highlights: silver wax very lightly
Antique silver
- Base: black
- Metal layer: dull silver (not chrome)
- Aging wash: black, wiped back aggressively
- Highlights: bright silver on rim and handles
Distressing tricks that look natural
Focus wear where hands would touch
Edges, handles, corners, and raised trim get the most rubbing and polishing. Distress those areas first and keep the center calmer.
Sand lightly after everything is cured
Once fully dry, lightly sand the rim and high points with a sanding sponge. This reveals the darker base in a way that reads like worn metal.
Do not distress evenly
Uniform distressing screams “DIY.” Make one handle slightly more worn than the other. Let one corner look older. Asymmetry looks real.
Make flimsy trays feel heavier
- Mount it to something solid: Hot glue or strong double-sided mounting tape can attach a platter to a thrifted frame, a wood round, or an upside-down bowl to create a “real” looking riser. If you love thrift flips, you will enjoy these thrift store decor flips too.
- Add feet: Small felt pads or rubber bumpers underneath keep the tray from sliding and add a tiny bit of height.
- Style it like a pro: Layer napkins, parchment, doilies, or a real food-safe plate on top so the tray reads like part of a styled tablescape, not a disposable catering piece. For more table styling, browse Tablescapes & Centerpieces.
Common problems and quick fixes
“My metallic looks too shiny and cheap.”
Add a dark wash and wipe it back, then switch to a matte or satin clear coat if you are sealing. You can also dust the tray with a very light mist of dark brown from far away to knock the shine down.
“The paint scratches off.”
Usually it is one of these: no bonding primer, not enough cure time, or handling too soon. Next time: scuff, prime for plastic, and let it cure overnight before distressing or sealing.
“It looks flat, like one color.”
Bring back contrast. Add a darker wash to creases and corners, then dry-brush brighter metallic on high points.
“My spray paint feels tacky.”
Humidity can do this, and so can heavy coats or certain paint and plastic combinations. Move the piece to a warmer, drier spot and give it more time. Keep coats thin.
If it is still tacky after 48 hours, it is usually faster to strip the finish and restart with a plastic-bonding primer and a different paint system that cures harder on that specific plastic.
How I use faux-metal platters at parties
- Under wrapped cookies or bagged favors
- As a “base” for a smaller food-safe dish (chips, rolls, fruit)
- For napkins, utensils, mini plates, and condiment packets
- On a cake or dessert table as a visual break between glass and paper
If you are in full budget-mode for a big celebration, you might also like my thoughts on renting vs buying event decor for large parties. Faux finishes are one of my favorite “buy cheap, make it look expensive” moves.
Quick finishing checklist
- Wash and alcohol wipe
- Light scuff sand
- Bonding primer, 2 light coats
- Dark base coat
- Metallic mist coat, do not fully cover
- Aging wash, wiped back
- Dry-brush highlights (or metallic wax)
- Optional satin or matte clear coat (test underside first)
- Let cure before stacking or transporting
When you line up a few matching faux-metal platters across a buffet, the whole spread instantly looks intentional. And that is the real goal, right? Making the party feel polished without paying “polished” prices.
More low-cost upgrades live in Budget Party Hacks.