Make a photogenic event entrance with a painted canvas drop cloth. Get simple steps for sizing, pre-washing, hemming, stenciling clean lines, curing paint, a...
Gathova
DIY Acrylic Welcome Signs for Events

Joanna Mercer
Joanna Mercer is an enthusiastic DIY event decorator and the creative spirit behind Gathova's party guides. With years of hands-on experience designing stunning tablescapes, balloon garlands, and custom photo backdrops for friends and family, she specializes in accessible, budget-friendly celebrations. Joanna loves sharing her practical tips and crafting tutorials to help anyone turn an ordinary space into a memorable party venue.
Published
The first time I made an acrylic welcome sign, I did what every excited DIYer does. I started painting before I had a real plan for layout, spacing, or how I was going to keep my letters from wobbling. The good news is acrylic can be forgiving when it comes to fixing paint-pen mistakes, but it also scratches easily, so you want to work smart and handle it gently. Once you know two key tricks, back-painting and template tracing, you can get that crisp, professional look without needing a Cricut or a calligraphy degree.
This beginner guide walks you through both methods I use most: painting the back of acrylic for bold, smooth color and using paint pens on the front with a printed template for neat lettering. Mix and match them to fit your event style.

Why acrylic signs look pricey
Acrylic has that clean, glass-like finish that instantly reads modern. It also plays nicely with almost any theme.
- Minimalist weddings: clear acrylic with white ink and a simple green garland
- Birthday parties: a bold color block painted on the back with bright lettering on the front
- Baby showers: soft frosted paint backing with delicate script
It is lightweight, easier to store than framed glass, and it wipes clean if a guest leaves a fingerprint while pointing at the seating chart.
Supplies checklist
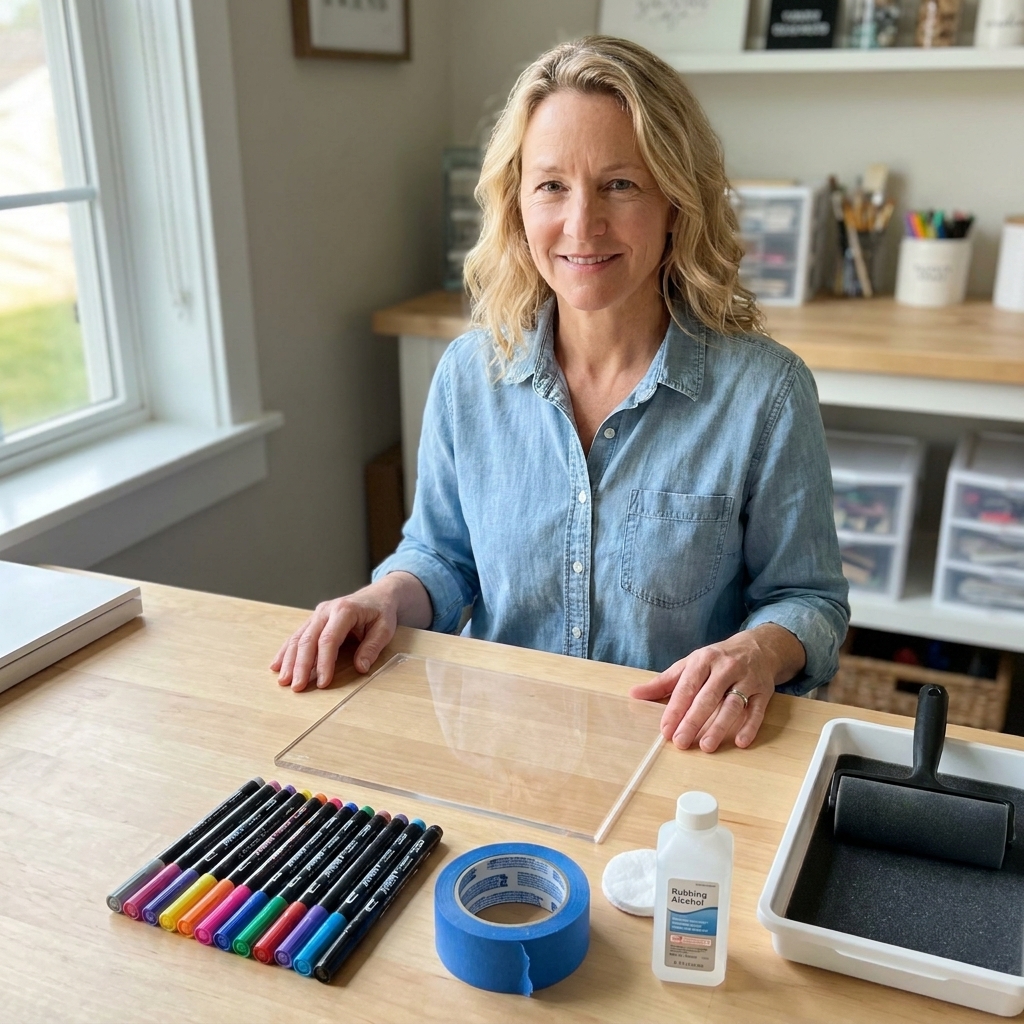
Acrylic and prep
- Acrylic sheet: common sizes are 18 x 24 inches or 24 x 36 inches. Thickness varies, too. Around 3 mm (about 1/8 inch) is common, but thicker sheets (roughly 3/16 to 1/4 inch) stay stiffer and feel more secure on an easel, especially for 24 x 36.
- Microfiber cloth
- Rubbing alcohol (70% or higher) for degreasing
- Painters tape for crisp edges and positioning guides
- Nitrile gloves (optional, but they prevent smudges)
For back-painting
- Acrylic craft paint or multi-surface acrylic paint
- Foam roller (my favorite for smooth coverage) or a wide, soft brush
- Small brush for corners
For lettering
- Paint pens: oil-based for strong opacity, or acrylic paint markers for easier cleanup
- Printed template: regular printer paper is fine
- Tape to hold the template in place
- White chalk marker or wax pencil (optional) for light guidelines
For display
- Easel or stand
- Command-style hanging strips only if you are mounting to a solid backing (not recommended for outdoor wind)
- Optional standoffs if you are attaching to a wood panel (hardware store item)
If you are building a backdrop moment around your sign, my go-to pairings are a simple balloon install and a lightweight photo stand. You might like DIY organic balloon arch that lasts all weekend and DIY PVC pipe photo booth backdrop stand.
Buying acrylic without overthinking it
If you are new to acrylic, here is what I look for when I am shopping:
- Pre-cut sheets: Great for beginners. If you can, choose a sheet with smooth edges so you are not fighting little burrs.
- Ask for cut-to-size: Many hardware stores will cut acrylic to your dimensions. If you are going large (like 24 x 36), consider going thicker for stiffness.
- Rounded corners: Not required, but it helps prevent corner chips and feels more “finished” in photos.
- Keep the film on: Buy sheets that still have the protective film intact on both sides. It is your best friend during prep, painting, and transport.
Before you start: the two-sided rule
Acrylic has a front and a back, and you want to decide early which side gets what.
- Front: lettering and fine detail (paint pens look sharp here)
- Back: big painted shapes or full backing color (this is the secret to a glossy, flawless finish)
Leave the protective film on as long as possible. I peel it back only where I am actively painting or writing. It acts like a built-in drop cloth and prevents random scratches while you work.
Step 1: Design your sign
Pick a layout that is hard to mess up
My most forgiving welcome sign layout looks like this:
- Small line: host names or event type
- Big word: “Welcome”
- Medium lines: date and location or a short greeting
Use two fonts max. One script, one simple sans serif, and you are set.
Print your template at full size
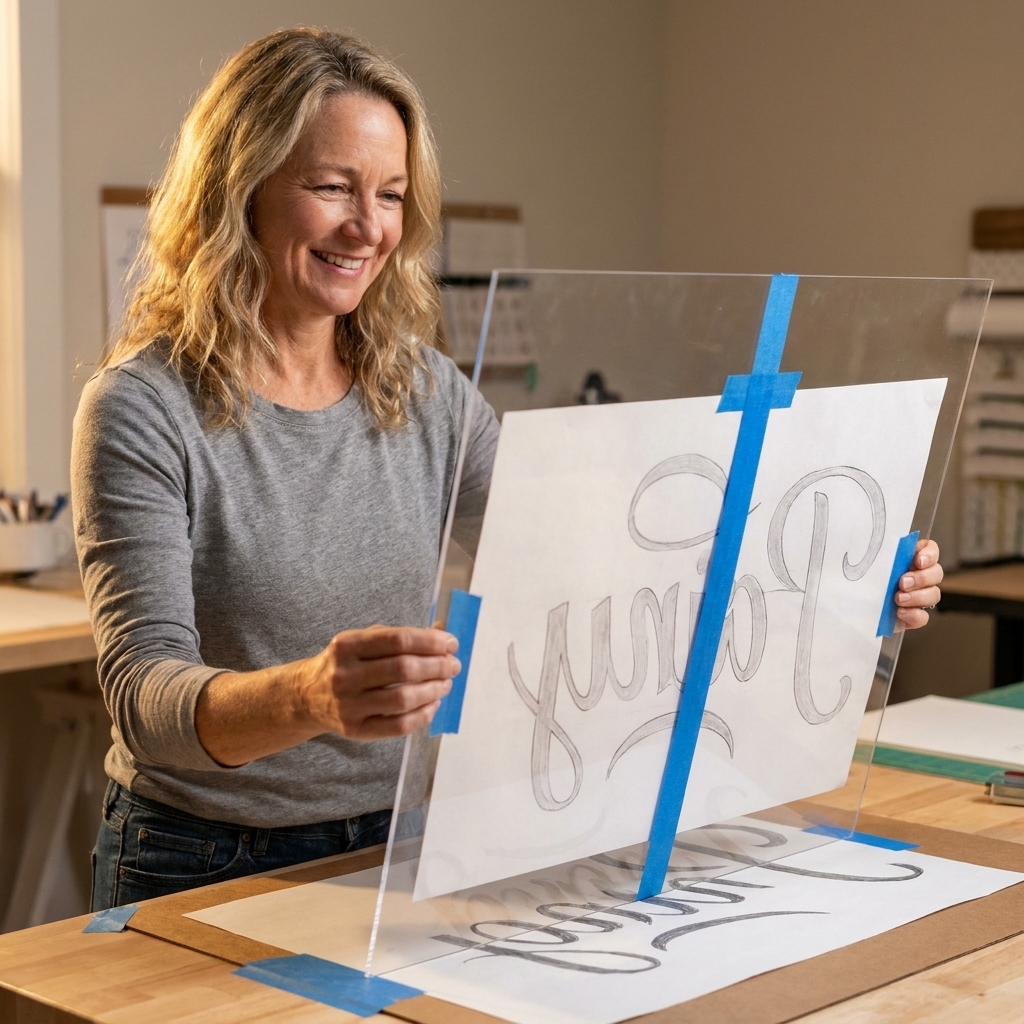
Design in any program you are comfortable with, then print it tiled on regular paper. Tape the pages together. Do a quick check by laying the paper behind the acrylic to confirm margins and spacing.
Tip from my garage: If you are nervous about centering, draw a vertical center line on the paper template and match it to a piece of tape on the acrylic as your alignment guide.
Method A: Back-painting
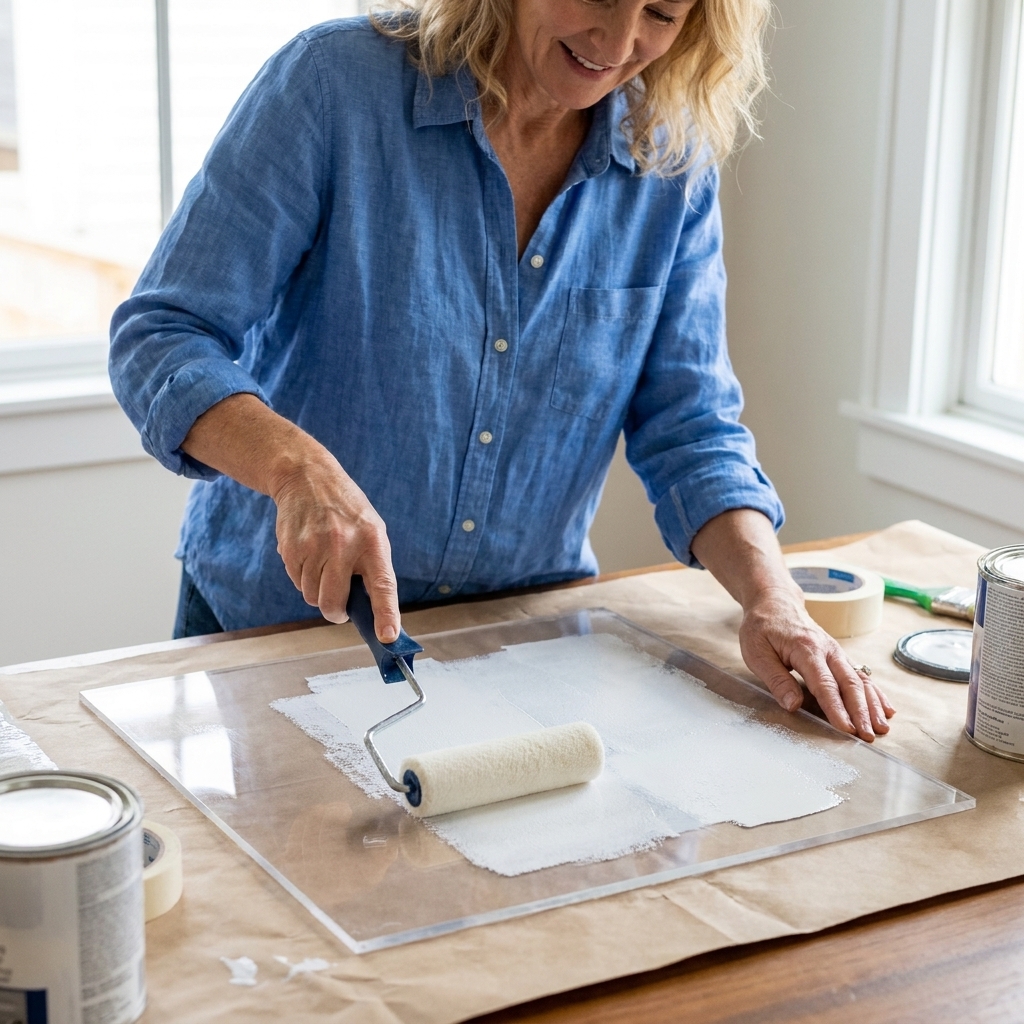
Back-painting is where acrylic really shines. When you flip the sign over, the paint looks smooth and glossy because you are viewing it through the acrylic.
Step-by-step back-painting
- Clean the acrylic. Wipe with rubbing alcohol and a microfiber cloth. Let it fully dry.
- Mask your edges. Use painters tape to create a crisp border or to block off a color section.
- Apply paint in thin coats. Use a foam roller for the smoothest result. Roll in one direction, then lightly cross-roll to even it out.
- Let each coat dry. Rushing is what causes tacky spots and texture. Follow the paint bottle for dry times.
- Do 2 to 4 coats. Most paints need multiple passes for fully opaque coverage.
- Peel tape slowly. Pull it back on itself at a low angle for clean lines.
Common back-painting issues (and fixes)
- Streaks: too much paint at once. Switch to thinner coats with a foam roller.
- Bubbles: heavy rolling or cheap foam. Roll gently, and do not overwork the paint.
- Paint peels with tape: not cured yet. Wait longer, and de-tack your tape by sticking it to your shirt first.
Design idea: Paint a soft arch shape on the back in a warm neutral, then write the details on the front in white paint pen. That combo reads boutique without being fussy.
Method B: Paint pens with a template
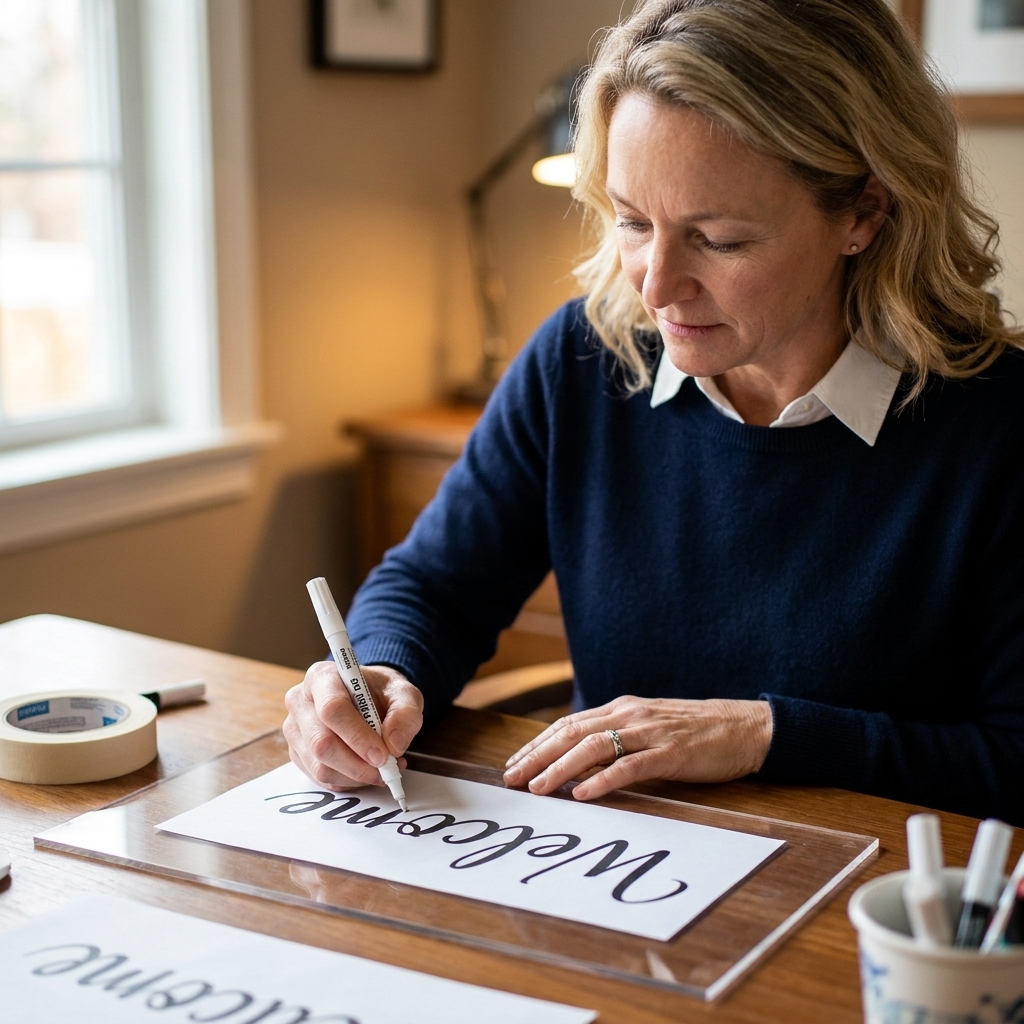
This is the method I recommend if you want neat words and you are not ready for freehand calligraphy. The printed template does the hard part for you.
Step-by-step template tracing
- Place the template behind the acrylic. Tape it down so it cannot shift.
- Choose your writing side. For easiest control, write on the front of the acrylic.
- Test your pen. Scribble on scrap acrylic, plastic packaging, or a glossy folder to see how the ink flows.
- Trace slowly. For script fonts, start with downstrokes and work your way through the word.
- Do a second pass if needed. Many paint pens look better after the first layer dries and you add a second coat.
- Let it cure. Give it time before flipping, cleaning, or transporting. Follow the pen label for dry and cure guidance.
How to keep lines from looking wobbly
- Anchor your hand: rest your pinky on the acrylic while you write.
- Rotate the sign: turn the acrylic instead of twisting your wrist.
- Pick a forgiving font: thicker scripts hide tiny wiggles better than super thin ones.
Can you write on the back instead?
Yes, but it is harder because everything is reversed. If you want the lettering protected from scratches and fingerprints, you can write on the back by mirroring your template before printing. For beginners, I usually keep lettering on the front and protect it during transport with clean paper laid over the surface.
Best results: front lettering plus back paint
If you want the sign to look high-end and photograph beautifully, combine both methods:
- Back: paint a full frosted panel or a color block so your text pops in photos
- Front: trace your lettering with paint pens for sharp edges
Order matters
When I do this combo, I always:
- Finish the back-painting first.
- Let the back paint dry and cure so it is not tacky when I flip and handle the sheet.
- Then do the front lettering last, with the sign laying flat, so I am not pressing my hand into fresh paint.
This also helps in dark venues. Clear acrylic can disappear against a busy background, but a subtle backing color gives your camera something to grab.
Dry time and cure time
This is the unglamorous part that makes the difference between “looks great” and “why is this smudging.” Dry means it is no longer wet to the touch. Cure means it has hardened enough to handle and transport without fingerprints and dents.
- Craft paint: often touch-dry within an hour or two, but can take a day or more to fully cure depending on thickness and humidity.
- Paint pens: can dry quickly on top, but still smudge if you stack paper on it too soon.
I follow the label first, then I give myself a cushion. If my event is Saturday, I try to finish the sign by Wednesday or Thursday.
How to frost acrylic
That dreamy frosted look is great for showers, weddings, and anything romantic. You have two practical options:
- Frosted spray (store-bought): fast and even, but do it outdoors with good ventilation and follow the can directions carefully.
- Frosted paint effect: lightly dry-brush a thin layer of white acrylic paint on the back for a soft haze. It will not be perfectly uniform, but it can look intentionally airy.
Whichever route you choose, keep your lettering area in mind so it stays readable.
Mounting and display
Easel setup tips
- Stability first: if your venue has breezes or high foot traffic, choose a sturdier easel and position the sign slightly out of the main walkway.
- Height matters: aim for the center of the sign to sit around chest height for easy photos.
- Hide the hardware: a small greenery tie or bow at the easel ledge can camouflage clamps.
If you want a full entry moment
Pair your welcome sign with simple lighting. Just be safe about it, especially outdoors. My safety checklist is in how to safely hang fairy lights outdoors.
Transport and storage
- Keep the protective film on until you are done.
- Layer clean paper between painted surfaces and anything that might rub.
- Transport flat when possible. If it must be upright, pad the corners and keep it from sliding.
- Bring a mini repair kit: paint pen, rubbing alcohol, cotton swabs, microfiber cloth.
Quick fix: If you make a small mistake with paint pen, let it dry fully, then gently scrape with a plastic scraper or an old gift card edge. Avoid metal blades, which can gouge acrylic. For fresh mistakes, a cotton swab with a tiny bit of rubbing alcohol can lift the ink, but spot-test first and do not soak or scrub hard since heavy rubbing can haze some acrylic surfaces.
Safety notes (especially if you drill)
Most welcome signs never need cutting or drilling, which is my favorite kind of project. But if you plan to add standoffs or mount acrylic to wood:
- Edges can be sharp: handle with care, and consider lightly sanding rough edges if needed.
- Drilling can crack acrylic: go slow, support the sheet fully, and practice on a scrap piece first.
- Use the right bit: acrylic does best with bits intended for plastic, plus gentle pressure. If you feel it grabbing, stop and reset rather than forcing it.
Beginner mistakes to avoid
- Skipping the cleaning step: oils from your hands can cause paint to bead or skip. An alcohol wipe takes 30 seconds and saves hours of frustration.
- Trying to cover in one thick coat: it dries uneven and shows texture. Thin coats win.
- Low-contrast text: clear acrylic plus pale ink can vanish in photos. Add a back-painted panel or go darker on lettering.
- Writing before priming the pen: some pens splatter on first press. Get the flow steady on scrap first.
- Not leaving enough cure time: it feels dry but still smudges. Give it breathing room, especially before transport.
FAQs
What size acrylic sheet should I buy for a welcome sign?
For most events, 18 x 24 inches is the sweet spot. It is readable, easy to carry, and fits on standard easels. If your entry is wide or you want big impact, 24 x 36 inches looks amazing but is harder to transport, and I recommend considering a thicker sheet so it does not flex as much.
Do I need to seal a paint pen acrylic sign?
Usually no, and sealing can backfire if the spray reacts with the pen ink. If the sign will be handled a lot, I prefer to protect it during transport and display it where guests are not touching the lettering.
Can I use regular acrylic paint on the front for lettering?
You can, but it is trickier to get clean edges without a brushstroke look. Paint pens are more beginner-friendly for lettering, especially over a template.
How far in advance can I make it?
I like to finish acrylic signs at least 2 to 3 days before the event so everything fully cures and I have time for touch-ups without panic.
One last pep talk
Acrylic signs feel intimidating because they are so glossy and visible, but that is exactly why the two tricks in this guide work so well. Let the acrylic do the polishing for you with back-painting, and let your printer do the spacing with a full-size template. After one sign, you will suddenly notice how many moments at a party can be elevated with good signage, welcome boards, bar menus, dessert labels, even a little “take one” note at the favor table.
If you are building out more DIY decor for the same event, start here: DIY Decor Projects.