Learn how to build a sturdy, reusable PVC pipe backdrop stand for photo booths. Includes ideal sizes, a 6x7 cut list, assembly steps, and stability tips for ...
Gathova
Sturdy Front Porch Pumpkin Archway for Halloween

Joanna Mercer
Joanna Mercer is an enthusiastic DIY event decorator and the creative spirit behind Gathova's party guides. With years of hands-on experience designing stunning tablescapes, balloon garlands, and custom photo backdrops for friends and family, she specializes in accessible, budget-friendly celebrations. Joanna loves sharing her practical tips and crafting tutorials to help anyone turn an ordinary space into a memorable party venue.
Published
The first time I tried to “just hot glue some pumpkins to a garland” for my front porch, a gusty October night turned it into a pumpkin tumbleweed situation. Lesson learned: if you want a big, photo-worthy pumpkin archway that actually survives weather and door traffic, you need two things you cannot see in the final photos: a real frame and real anchoring.
This is the method I use now. It looks lush and expensive, but it is basically a sturdy internal skeleton dressed in lightweight foam pumpkins, plus a few smart weatherproofing tricks so you can leave it up for the whole season. One quick note up front: PVC is very rain-friendly, but sun and time can make it brittle, so treat it as seasonal decor, not a permanent installation.
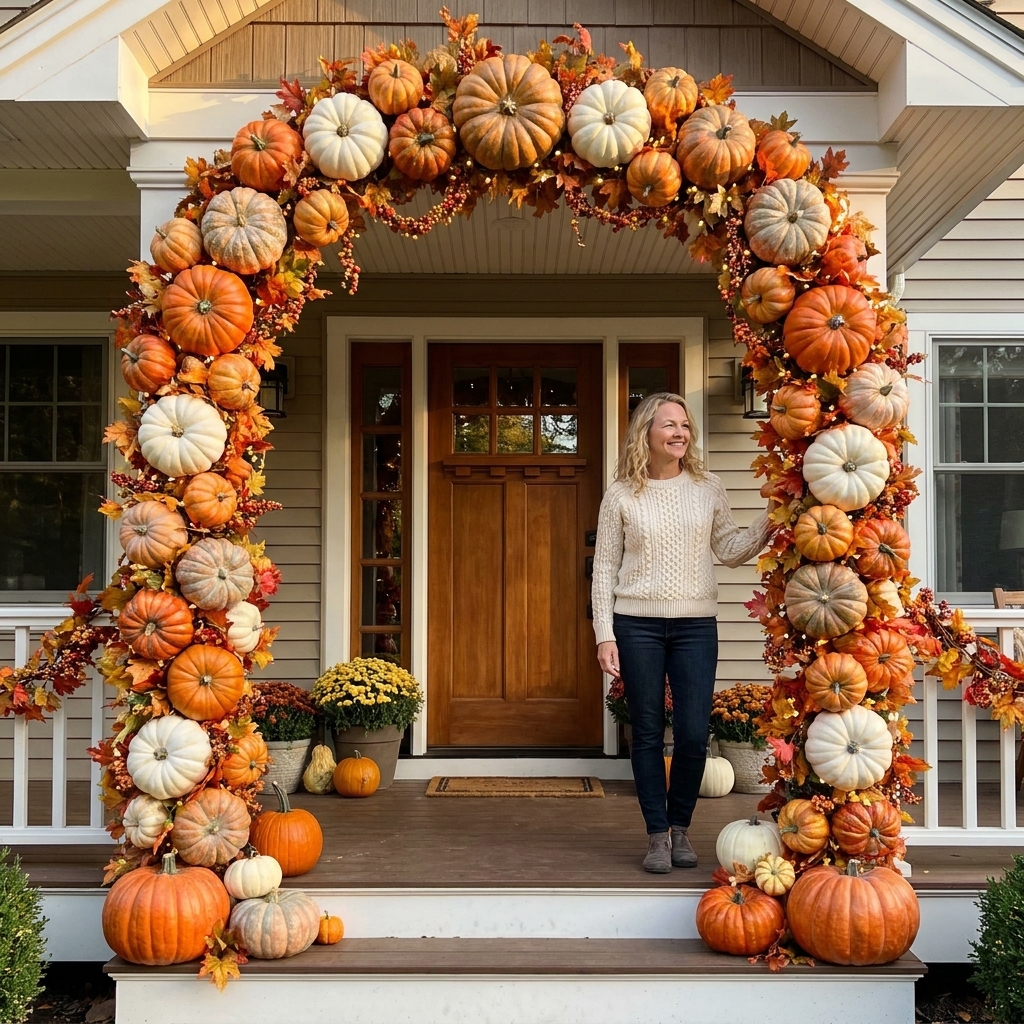
Plan your archway
Before you buy anything, measure. A porch archway only works if it frames the door without smacking your trim, blocking your walkway, or wobbling when someone carries in groceries.
Quick measuring checklist
- Door opening height: floor to the top of the exterior door casing or trim.
- Door opening width: outside edge of the exterior casing or trim to outside edge.
- Clearance zone: I like at least 6 to 8 inches of space between the arch and the casing on both sides, and 8 to 12 inches above the casing if you have room.
- Walkway width: make sure the arch base does not pinch the path.
My favorite porch-friendly size: an arch that is about 12 to 18 inches wider than the outer casing and 12 inches taller than the casing. Big impact, still practical.
Safety reality check: If your porch sits close to the sidewalk, keep bases tucked back and out of the walking line. I would rather make the arch slightly less wide than create a nightly shin-bumper for trick-or-treaters.
Materials and tools
You can build the frame a few different ways. For outdoors, I strongly prefer PVC because it is water-resistant and forgiving. If you already have a metal arch frame, use it, but the anchoring steps below still apply.
Frame
- PVC option (recommended): 3/4 inch Schedule 40 PVC pipe plus fittings (2 elbows, 2 tees, and optional couplers depending on your size).
- Pre-made metal garden arch: choose one wide enough for your door and reinforce the feet with weighted bases.
Anchoring and stability
- Two heavy bases: planters, sand-filled buckets, or weighted umbrella stands.
- Quikrete or sand: if you are weighting buckets or planters.
- Zip ties: lots of them in outdoor-rated black or clear.
- Outdoor electrical tape or UV-rated tape for quick wraps and bundling (best for short-term holds).
- Cable clamps or pipe straps (optional): a longer-lasting way to fasten lights and garland to the frame.
Decor layer
- Foam pumpkins: assorted sizes. Mix in a few muted tones (cream, sage, tan) so it looks styled, not costume-y.
- Outdoor faux leaf garland: optional but helps hide mechanics.
- Floral wire: 22 to 18 gauge for securing stems and pumpkins.
- Optional extras: pinecones, faux berries, mini gourds, dried-looking picks.
- Outdoor string lights: warm white, battery pack protected from rain or plug-in rated for outdoor use.
Tools
- PVC cutter or saw
- Drill with small bit (for hidden zip tie holes in pumpkins)
- Scissors and wire cutters
- Hot glue gun (high temp) and glue sticks
- Outdoor-rated construction adhesive (optional): make sure it is compatible with foam and plastics. Some solvent-heavy adhesives can melt foam.
If you enjoy building structural decor, my PVC approach is similar to how I build sturdy backdrops. You might also like my tutorial on a DIY PVC pipe photo booth backdrop stand, because the same “make it square, then weight it” logic applies.
Build the frame
The goal is a frame that stands on its own, does not rack side-to-side, and can be anchored without damaging your porch.
Step 1: Pick a shape
- U-shape (easiest): two vertical legs and a curved or angled top. Best for narrow porches.
- Squared arch (most stable): looks more modern, easiest to brace.
- Soft curve: achievable with segmented PVC (small straight sections) or flexible PVC. If you go flexible, check connector and adhesive requirements first, because it does not always behave like rigid pipe.
For most homes, I do a squared arch with a slightly rounded look created by the pumpkin layer.
Step 2: Cut PVC for two legs and a top span
Typical starting cuts for an average porch (adjust to your measurements):
- Legs: 2 pieces at 6.5 to 7.5 feet each
- Top: 1 piece at 4 to 5 feet
A common exterior door is around 80 inches tall before trim. Once you add casing, you might land closer to the mid-80s. Use your real trim measurement, then build in that clearance zone so the arch feels roomy, not cramped.
If you need it taller, do not make the legs too spindly. Go wider at the base and add more weight instead of pushing height to the limit.
Step 3: Build weighted bases
This is where your arch stops acting like a sail.
- Choose bases: two sturdy planters or buckets that can sit on each side of your door.
- Weight them: fill with sand, pea gravel, or concrete. Concrete is the most stable. Sand is easier to dump at the end of the season.
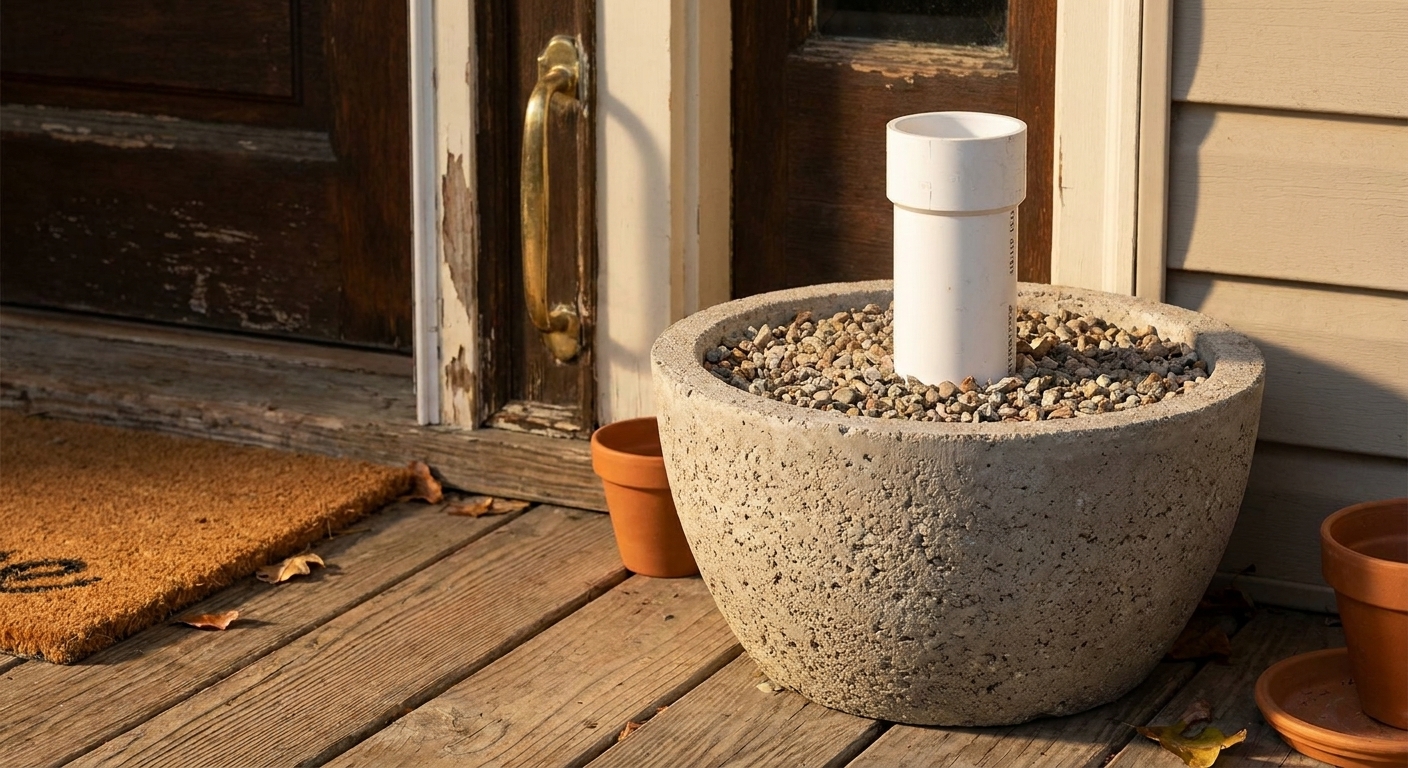
- Set a PVC socket in the center: before the concrete sets, stand a short piece of PVC (about 6 to 10 inches) upright so your arch leg can slide into it later. If you are using sand, bury the socket and pack tightly.
Practical note: Concrete is heavy and can crack some decorative planters. If you are using a nicer planter, I like a simple bucket-in-bucket approach: set a cheap plastic bucket inside the planter as a liner, then pour the concrete into the inner bucket. When you move it, lift from the bucket, not the rim of the planter.
Porch protection tip: Stick felt pads or a thin rubber mat under the bases so you do not scratch paint or gouge wood when you nudge things into place.
Tip from my garage experiments: Make the socket slightly wider than your leg. For example, use 1 inch PVC as a socket for a 3/4 inch leg. It makes assembly and disassembly so much less annoying.
Assemble and brace
Step 1: Dry fit first
Before you glue anything, dry fit the legs and top span and set them into the base sockets. Check:
- Is it centered on the door?
- Does the door open fully without hitting?
- Is there enough sidewalk clearance?
Step 2: Add bracing
This is the secret sauce for “sturdy.”
- Cross brace (best): add a diagonal brace from lower left to upper right on the back side, and another from lower right to upper left if you can hide it with pumpkins and leaves.
- Corner gussets (easy): at the top corners, add short PVC pieces to form triangles.
You can use PVC and fittings for bracing, or even a strip of perforated metal plumber’s tape if it will be hidden. The goal is to stop racking when the wind hits.
Step 3: Decide what to glue
If you want to store the frame, do a semi-permanent build:
- Glue only the top corners so the arch stays square.
- Keep the legs removable from the weighted bases so you can lift it out.
For the porch, I prefer removable legs. It makes storm prep easier.
Prep pumpkins
Foam pumpkins are wonderfully lightweight. Outdoors, their weak point is usually the finish and the attachment method, not the foam itself.
Weatherproofing checklist
- Seal paint if needed: if your pumpkins are painted or glittered, spray with a clear outdoor sealer and let cure fully. Do this in a ventilated area.
- Add attachment points: instead of relying on hot glue alone, give yourself places to zip tie and wire.
My favorite attachment hack: hidden zip tie channels
- On the back or underside of each pumpkin, drill two small holes about 1 to 1.5 inches apart.
- Thread a zip tie through, creating a loop you can cinch around the frame.
- Use hot glue only as a positioning helper, not the structural hold.
Quick drill tip: Some craft pumpkins are thin foam over a plastic shell. Test on one pumpkin first, start with a small bit, and drill at low speed with light pressure so you do not crack the surface.
This takes longer up front, but it is the difference between “lasts one night” and “lasts the season.”

Dress the frame
Think of this like styling a Christmas tree. Big items set your shape, then you fill gaps.
Step 1: Start with the biggest pumpkins
- Place the largest pumpkins on the lower sides first. They visually ground the arch.
- Work upward with medium pumpkins.
- Use smaller pumpkins near the top and inner curve.
Spacing tip: Step back every 5 to 6 pumpkins. Your eye will catch bald patches faster from a distance than up close.
Step 2: Use a belt-and-suspenders attachment
- Zip tie each pumpkin to the frame where possible.
- Wire around stems or through drilled holes for extra security.
- Hot glue only to stop shifting, not to carry weight.
Step 3: Add leaf garlands and picks
Once the pumpkins are stable, weave leaf garland through gaps to hide PVC and zip ties. Then tuck in picks and pinecones to make the arch look intentional.
If you love the fuller, richer look, borrow a trick from tablescapes: layer. I use the same mindset I share in layering chargers, plates, and napkins, just translated into porch decor. Base layer (pumpkins), mid layer (leaves), top layer (special accents).
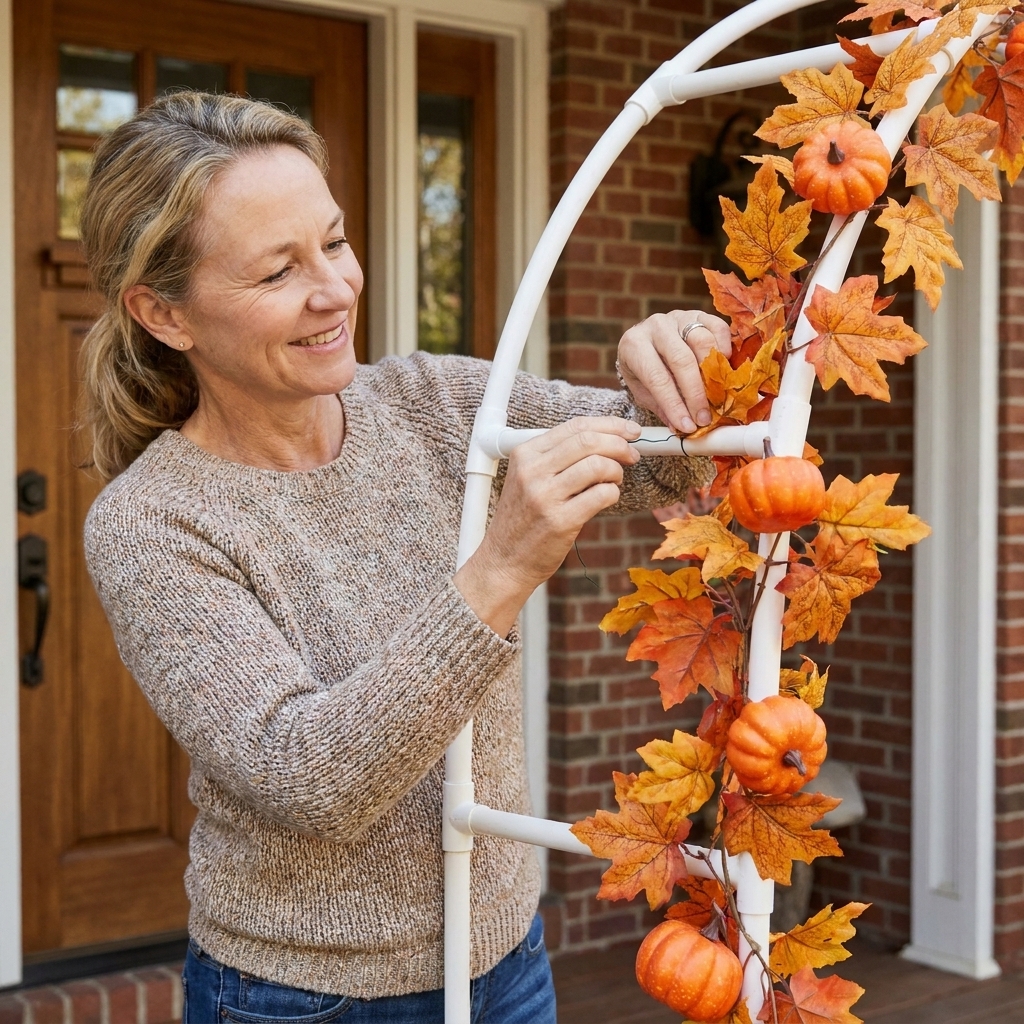
Add lighting
Lighting is what makes a porch archway feel magical at dusk. Use outdoor-rated lights and keep connections protected from rain.
- Wrap lights on the frame first before filling every gap with pumpkins if you can. It is easier.
- Protect the power source: If you are using a battery pack, keep it in a rain-protected container that still has a little airflow, and set it up off the porch floor so it is not sitting in pooled water. If it bakes in direct sun, give it shade.
- Avoid trip hazards: route cords along the wall edge, not across the walkway.
For more detailed safety pointers, I wrote a full guide on how to safely hang fairy lights outdoors. The same rules apply here, especially around moisture and cord routing.
Make it weather-ready
You cannot control the weather, but you can absolutely stack the odds in your favor.
Wind
- More weight beats more glue: if your arch moves, add weight to the bases.
- Anchor discreetly: if you have porch columns or railings, you can loosely secure the arch with removable straps or additional zip ties. Protect painted surfaces with a scrap of felt or rubber so you do not scuff anything.
- Lower the profile: if your porch is very windy, keep the arch a bit wider than tall.
Rain
- Choose plastic or foam decor rather than paper or real dried items.
- Seal vulnerable finishes on pumpkins and picks.
- Elevate bases slightly if water pools on your porch, so the bases are not sitting in puddles for weeks.
Sun fade
- Mix colors intentionally: when bright orange fades, it can look blotchy. Adding creams, tans, and muted oranges makes fading less obvious.
- Rotate pumpkins: if one side gets full sun every day, swap a few pumpkins around halfway through October.
Take it down and store it
If you want to reuse your arch next year, disassembly matters.
- Photograph it from the front and both sides so you can recreate the layout next season.
- Cut zip ties instead of ripping pumpkins off. Save the pumpkins with their drilled holes for easy reattachment.
- Store pumpkins in bins with soft filler (kraft paper works) so stems and paint do not rub.
- Keep the frame in labeled sections if it breaks down. A little masking tape label goes a long way.
Troubleshooting
My arch sways in the wind
- Add more weight to bases first.
- Add a diagonal cross brace on the back.
- Make sure the legs are seated deeply into their sockets.
Pumpkins keep popping off
- Use zip ties or wire as the primary hold.
- Clean dust off pumpkin surfaces before hot glue or adhesive.
- Stop attaching to leaf garland. Attach pumpkins to the frame, then weave greenery around them.
It looks lumpy and uneven
- Start over on one side and mirror your spacing.
- Use bigger pumpkins low and smaller pumpkins high.
- Fill visual gaps with leaf clusters and picks, not more big pumpkins.
Optional upgrades
- Monochrome arch: all cream and tan pumpkins with deep burgundy leaves for a modern look.
- Gothic twist: mix in black pumpkins and moody florals for drama. If that is your vibe, you will probably love elegant gothic dinner party decor for color palette ideas that translate beautifully outdoors.
- Harvest glam: add a few metallic pumpkins. You can even paint plastic pieces to look like metal using my faux metal finish technique, then tuck them into the arch as accents.
FAQ
How many foam pumpkins do I need?
For a typical front-door arch, I plan on 30 to 60 pumpkins depending on size mix and how full you want it. Using more small pumpkins fills gaps fast, but a few larger pumpkins keep it from looking busy.
Can I do this without drilling holes in pumpkins?
You can, but I would not for outdoors. If you absolutely cannot drill, wire around stems and use outdoor-rated construction adhesive that is foam-safe, then back it up with strategically hidden zip ties around the pumpkin body.
Will PVC get damaged outside?
PVC handles rain well. UV can make it a bit brittle over time, but for seasonal use it is a great choice. Paint is optional because the pumpkins and leaves should cover it.
What if I rent and cannot attach anything to the house?
This method is renter-friendly because the stability comes from weighted bases, not screws into your porch. Keep everything free-standing and avoid tying to railings if you are worried about scuffs.
If you build this archway, give yourself an afternoon, put on a spooky playlist, and embrace the trust-the-process phase where it looks awkward halfway through. Once the big pumpkins are in and the greenery starts hiding the mechanics, it turns into that front-porch moment that makes everyone slow down for a photo.
For more seasonal builds, you can browse the Seasonal & Holiday category anytime.